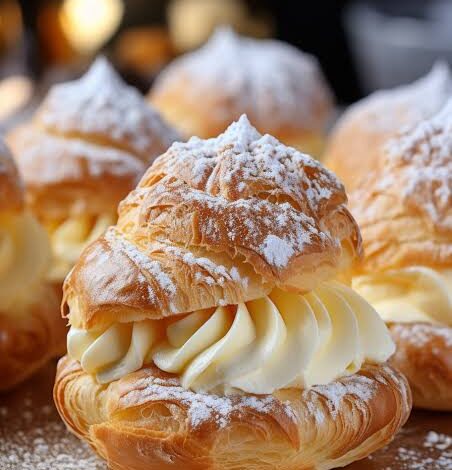
Cream puffs are some of the most delightful and magical pastries you can ever make in your own kitchen. They look like fancy treats from a high end French bakery, but they are actually surprisingly simple to make once you know the secret steps. This recipe is all about creating the perfect choux pastry, which is a special kind of dough that rises up beautifully in the oven using just steam. When you bake them right, they become light, airy, and completely hollow on the inside, making them the perfect little edible cups for holding rich, smooth creams. Whether you want to fill them with a classic sweet vanilla custard, a rich chocolate pudding, or just simple whipped cream with a dusting of powdered sugar, this recipe will be your ultimate guide to getting it right every single time. You do not need any crazy baking skills or expensive kitchen gadgets to master this treat because it all comes down to basic kitchen ingredients that you likely already have in your pantry right now.
People all over the world absolutely adore these little treats because they offer the most amazing contrast of textures and flavors in every single bite. The outer shell is beautifully golden brown, slightly crisp, and wonderfully light, while the inside is cool, creamy, and bursting with sweet goodness. They are not overly heavy or dense like dense cakes or thick brownies, which means you can easily eat two or three of them without feeling weighed down. There is a certain sense of pure nostalgia and joy associated with biting into a fresh cream puff and having a little bit of the cool cream spill out of the sides. Kids love them because they look like magical little clouds, and adults love them because they bring back fond memories of special family gatherings and bakery visits. Plus, you can easily customize the sweetness and the fillings to match exactly what your family loves, which makes this recipe a massive crowd pleaser for everyone.
There are so many wonderful reasons and occasions to whip up a fresh batch of these beautiful cream puffs in your home kitchen. They are the ultimate dessert to bring to a fancy holiday party, a casual backyard barbecue, a sweet baby shower, or a cozy Sunday family dinner because they always look so incredibly impressive on a serving platter. Beyond special events, baking these treats can be a deeply comforting and emotional experience because the wonderful aroma of baking pastry will fill your entire home with warmth and happiness. If you are someone who watches what you eat, these are also fantastic because you can easily swap the heavy sugar for a natural sweetener or use a low fat milk to create a lighter version that still satisfies your sweet tooth. Whenever you feel like expressing your love through baking or simply want to treat your family to a bakery quality dessert after a long week, this recipe is the perfect way to do it.
Making these pastries from scratch is also a wonderful way to boost your confidence in the kitchen and learn the fundamental rules of classic baking. It feels like a fun science experiment as you watch the simple liquid dough puff up in the oven without using any baking powder or yeast at all. It is a fantastic project to do with your children or your friends on a rainy afternoon because everyone can join in on the fun of whipping the cream and piping it into the cool pastry shells. Once you see the look of absolute amazement on the faces of your loved ones when you serve these, you will want to make them for every single celebration. You do not have to worry about strict fitness rules either, because enjoying a homemade treat made with real, whole ingredients is always a wonderful way to practice balance in your life. Let us dive into the simple ingredients you need to get started on this delicious baking journey today.
Ingredients You Will Need
To create the perfect pastry shells, you will need to gather these exact ingredients:
-
One cup of pure clean water
-
Half a cup of unsalted butter which equals eight tablespoons
-
One quarter of a teaspoon of fine table salt
-
One teaspoon of granulated white sugar
-
One cup of all purpose white flour
-
Four large eggs at room temperature
To create the rich and creamy filling, you will need to gather these ingredients:
-
Two cups of heavy whipping cream
-
One quarter of a cup of powdered confectioners sugar
-
One teaspoon of pure vanilla extract
To create the beautiful decorative top finish, you will need:
-
Two tablespoons of powdered confectioners sugar for dusting over the finished pastries
Step by Step Method
Step One Cooking the Pastry Base
Grab a medium saucepan and place it on your stove over medium heat. Pour in your one cup of pure clean water, add the half cup of unsalted butter, the one quarter teaspoon of fine table salt, and the one teaspoon of granulated white sugar. Let this mixture come to a full rolling boil so that the butter is completely melted and combined with the water. As soon as it boils, turn the heat down to low and dump in the entire one cup of all purpose white flour all at once. Grab a sturdy wooden spoon or a silicone spatula and stir the mixture as fast as you can. Keep stirring vigorously for about one to two minutes until the flour drinks up all the liquid and forms a smooth, shiny ball of dough that pulls away from the sides of the pan. You will notice a thin film forming on the bottom of your saucepan, which is a great sign that the flour is cooked perfectly. Remove the pan from the heat and let the dough cool down for about five minutes so it is not scalding hot.
Step Two Incorporating the Eggs
This is the most important step for getting that perfect rise in your pastry. Make sure your four large eggs are at room temperature because cold eggs can ruin the texture of the dough. Add the first egg into your warm dough ball and beat it vigorously with your wooden spoon or use a hand mixer on medium speed. At first, the dough will look weird and separated into slippery pieces, but keep mixing and it will suddenly smooth out. Once the first egg is completely mixed in and the dough looks uniform again, add the second egg and repeat the vigorous mixing process. Do the exact same thing for the third egg and then the fourth egg, making sure each one is fully absorbed before adding the next. When you are done mixing all four eggs, your dough should look very smooth, glossy, and thick. When you lift your spoon up, the dough should fall slowly and leave a clear V shape on the end of the spoon.
Step Three Shaping the Puffs
Before you start shaping your dough, preheat your oven to four hundred degrees Fahrenheit and line a large baking sheet with a piece of parchment paper. If you have a pastry piping bag with a large round tip, you can scoop your glossy dough into it to pipe your shapes. If you do not have a piping bag, do not worry at all because you can simply use two ordinary tablespoons from your kitchen drawer. Scoop up a rounded tablespoon of the dough and use the second spoon to push it onto your lined baking sheet, creating a neat little mound. Repeat this process until you have twelve equal mounds of dough, making sure to leave at least two inches of space between each one because they will expand massively in the oven. Dip your clean finger into a little bit of cold water and gently tap down any sharp points on top of the dough mounds so they do not burn while baking.
Step Four Baking to Perfection
Place your baking sheet on the middle rack of your preheated oven and close the door gently. Bake the pastries at four hundred degrees Fahrenheit for exactly twenty minutes without opening the oven door even a single time. Opening the door early lets out the hot steam, which will cause your beautiful puffs to collapse into flat pancakes. After twenty minutes, turn your oven temperature down to three hundred and fifty degrees Fahrenheit and bake them for another fifteen minutes until they are deeply golden brown and firm to the touch. Once that time is up, turn the oven completely off and take the baking sheet out. Use a sharp little knife or a toothpick to poke a small hole in the side or bottom of each hot puff to let the trapped steam escape. Put them back into the turned off oven with the door cracked open for ten minutes to let them dry out completely on the inside.
Step Five Whipping the Sweet Cream
While your beautiful pastry shells are cooling down completely on a wire rack, it is time to make the delicious cream filling. Take a large mixing bowl, and for the best results, put the bowl and your mixer beaters in the freezer for ten minutes beforehand because cold tools make cream whip much faster. Pour your two cups of cold heavy whipping cream into the chilled bowl. Add your one quarter cup of powdered confectioners sugar and your one teaspoon of pure vanilla extract. Turn your hand mixer onto medium high speed and beat the cream continuously for a few minutes. Watch it closely as it transforms from a liquid into a thick, fluffy cloud. Stop mixing as soon as you see stiff peaks form, which means the cream holds its shape perfectly when you lift the beaters out. Be careful not to overmix it, or it will turn grainy and start turning into homemade butter.
Step Six Filling and Serving
Make sure your baked pastry shells are totally cool to the touch before you even think about adding the cream, otherwise your beautiful whipped cream will melt into a watery mess. There are two wonderful ways to fill your cream puffs depending on what you prefer. The easiest way is to use a sharp serrated knife to slice each pastry shell horizontally right through the middle, creating a top half and a bottom half. Use a spoon or a piping bag to pile a generous amount of the fluffy whipped cream onto the bottom half, then gently place the top half back on like a little sandwich. Alternatively, you can use a pastry bag with a star tip to push the tip right into the little hole you poked earlier and squeeze the cream inside until the puff feels heavy. Arrange your finished masterpieces beautifully on a serving platter and dust them with the remaining two tablespoons of powdered sugar right before serving.
Why This Recipe Is Special
This particular cream puff recipe is incredibly special because it relies on pure simplicity and classic techniques rather than artificial ingredients or complex box mixes. By mastering this basic dough, you are learning a timeless culinary skill that allows you to create high quality desserts completely from scratch whenever you want. The flavor profile is exceptionally balanced because the pastry shell itself is not very sweet, which pairs beautifully with the rich, sugary vanilla cream tucked inside.
From a health perspective, making these treats at home means you have total control over every single thing that goes into your body. You do not have to worry about the strange preservatives, artificial colors, or chemical shelf stabilizers that commercial bakeries use to keep their pastries fresh for days. You are using real butter, fresh farm eggs, and pure cream, which provide natural fats and wholesome protein to your diet. It is a wonderful way to enjoy a true luxury dessert while keeping your lifestyle clean, honest, and entirely homemade.
Extra Tips for Better Taste
To elevate your cream puffs to an even higher level of deliciousness, you can experiment with a few creative flavor additions. Try melting some high quality dark chocolate in a small bowl and drizzling it generously over the tops of your filled pastries for a stunning bakery look. You can also press fresh red raspberries, sliced sweet strawberries, or juicy blueberries directly into the whipped cream before closing the pastry shells for a refreshing fruity twist.
If you want to change up the filling, you can fold a few spoonfuls of rich lemon curd, sweet caramel sauce, or hazelnut chocolate spread directly into your whipped cream. For an incredibly aromatic twist, scrape the seeds of a fresh whole vanilla bean into your heavy cream instead of using liquid extract. Another fantastic trick is to sprinkle a tiny bit of coarse sea salt over the chocolate drizzle to create a sophisticated sweet and salty flavor profile that your guests will absolutely rave about.
Final Thoughts
Baking your own famous cream puffs from scratch is a deeply rewarding journey that brings immense joy to both the baker and the lucky people who get to eat them. It is a beautiful reminder that simple everyday ingredients like flour, water, eggs, and butter can transform into something truly extraordinary with just a little bit of patience and love. Do not be intimidated by the process because each step is a fun opportunity to learn and connect with the art of traditional baking. Once you share these light, airy, and cream filled delights with your favorite people, it will quickly become a highly requested favorite in your household. So put on your favorite kitchen apron, turn on some fun music, and enjoy every single moment of creating this timeless, elegant dessert in your home today.
Nutrition Details
| Nutrient Component | Amount Per Single Serving |
| Total Calories | Two Hundred And Forty Calories |
| Total Fat | Nineteen Grams |
| Saturated Fat | Twelve Grams |
| Total Cholesterol | One Hundred And Five Milligrams |
| Total Sodium | Eighty Five Milligrams |
| Total Carbohydrates | Twelve Grams |
| Dietary Fiber | Zero Grams |
| Total Sugars | Five Grams |
| Total Protein | Four Grams |
Disclaimer
Please keep in mind that everyone has a completely unique body with different nutritional needs, health goals, and dietary tolerances. The nutritional values provided in the table above are general estimates calculated based on standard ingredients and should only be used as a helpful guide. If you have specific health concerns, medical conditions, or strict dietary restrictions, it is always a wise idea to consult with a professional doctor or a registered dietitian. Your individual results, energy needs, and health outcomes can vary based on your daily activity levels and the specific brands of ingredients you choose to use in your kitchen.